First selenium test case in eclipse
You are ready to write your first selenium test case in eclipse after installation and selenium configuration in eclipse.
In our first selenium test case, we will see below given points one by one.
- Launch the browser.
- Maximize the browser.
- Navigate to URL.
- Locate page elements.
- Perform actions on all located elements.
- Close the browser.
Download chromedriver
Before downloading chromedriver, You have to check your chrome browser version. If it is older version then update it to latest version first.
Once chrome version is updated, you can download latest chrome driver as below.
- Open chrome driver download page.
- Click on download latest version of chrome driver.
- Another page will open. Click on chromedriver_win32.zip.
- It will download .zip file.
- Unzip it. You will get chromedriver.exe inside unzipped folder.
- Copy that chrome driver executable file and paste it in D: drive.
First test case
Here is first test for demonstration.
- Earlier we had added class file in testPackage package under Sample Project project folder.
- Also we had added selenium jar files in project's build path.
- Now look at below given test case.
First test case in selenium
package testPackage;

import org.openqa.selenium.By;
import org.openqa.selenium.WebDriver;
import org.openqa.selenium.WebElement;
import org.openqa.selenium.chrome.ChromeDriver;

public class SampleTest {

	public static void main(String[] args) {

		//Set path of chrome driver file.
		System.setProperty("webdriver.chrome.driver", "D:\\chromedriver.exe");
		//Initialize and Launch chrome browser.
		WebDriver driver=new ChromeDriver();

		//Maximize browser window.
		driver.manage().window().maximize();

	    //Navigate to test page URL.
		driver.get("http://only-testing-blog.blogspot.com/2014/05/form.html");

	    //Locate different elements on page
		//Locate First Name textbox.
		WebElement fnameTxt = driver.findElement(By.name("FirstName"));
		//Locate Last Name textbox.
		WebElement lnameTxt = driver.findElement(By.name("LastName"));
		//Locate Email ID textbox.
		WebElement emailTxt = driver.findElement(By.name("EmailID"));
		//Locate Mobile No textbox.
		WebElement mobTxt = driver.findElement(By.name("MobNo"));
		//Locate Company Name textbox.
		WebElement companyTxt = driver.findElement(By.name("Company"));
		//Locate Submit button.
		WebElement submitBtn = driver.findElement(By.xpath("//input[@type='submit']"));

	    //Type text in First Name textbox.
		fnameTxt.sendKeys("My first name");
		//Type text in Last Name textbox.
	    lnameTxt.sendKeys("My last name");
	    //Type text in EmailID textbox.
	    emailTxt.sendKeys("My email");
	    //Type text in Mobile no textbox.
	    mobTxt.sendKeys("123xyz");
	    //Type text in Company name textbox.
	    companyTxt.sendKeys("My company");
	    //Click on submit button.
	    submitBtn.click();
	}
}- System.setProperty("webdriver.chrome.driver", "D:\\chromedriver.exe"); -> To set chrome driver executable file path.
- WebDriver driver=new ChromeDriver(); -> To launch chrome browser.
- driver.manage().window().maximize(); -> To maximize browser window.
- driver.get("http://only-testing-blog.blogspot.com/2014/05/form.html"); -> To open URL in browser.
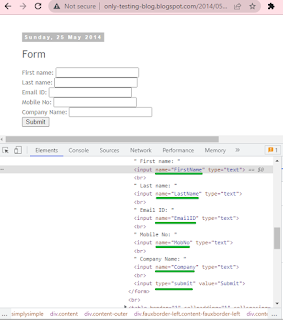
We have located all the textbox using name and submit button using xpath.
Below given statements will locate all the required elements.
- WebElement fnameTxt = driver.findElement(By.name("FirstName")); -> To locate First name textbox.
- WebElement lnameTxt = driver.findElement(By.name("LastName")); -> To locate Last name textbox.
- WebElement emailTxt = driver.findElement(By.name("EmailID")); -> To locate Email ID textbox.
- WebElement mobTxt = driver.findElement(By.name("MobNo")); -> To locate Mobile No textbox.
- WebElement companyTxt = driver.findElement(By.name("Company")); -> To locate Comapny name textbox.
- WebElement submitBtn = driver.findElement(By.xpath("//input[@type='submit']")); -> To locate Submit button.
- fnameTxt.sendKeys("My first name"); -> To type text in First name textbox.
- lnameTxt.sendKeys("My last name"); -> To type text in Last name textbox.
- emailTxt.sendKeys("My email"); -> To type text in Email ID textbox.
- mobTxt.sendKeys("123xyz"); -> To type text in Mobile no textbox.
- companyTxt.sendKeys("My company"); -> To type text in company name textbox.
- submitBtn.click(); -> To click on submit button.
This is our first selenium test case in eclipse. You can run and observe it in eclipse.
Run selenium test in eclipse
For running test case in eclipse, You can right click on class file -> Select Run As -> Select Java Application option as shown in below given image.


No comments:
Post a Comment