We have learnt about test specification now it’s time to move on with requirement specification. Test Link can save your entire requirement according to your test plan. It is explain all the requirement information about test project.
Tester can test whole project based on requirements and test cases also written on same bases. After execution of test cases , Test manager can verify the requirement specification and verify the all test cases which is executed successfully and decide that is that project should be go live or still some changes is require or any error is remain in development.
Test manger combines all the requirements and risk for a project and then verifies it as end user perspective. As in result we can get below advantages.
- If any requirement is missed in development then we can get it in early stage.
- User can focus on important thing only.
- We can create reports easily and get status of the project quickly.
- Test manager and client can verify all efforts by executing test cases and compare it with entered requirement. Risk can be observed too.
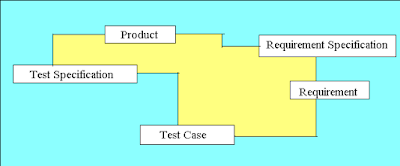
In this image, we can see that the requirement specification is defined in early stage.
First of all product have been defined afterwards we can move on next stage. The next stage is Test Specification and Test Requirements.
In Test specification all the test scenarios and test cases have been defined as per the Test requirement only. If more scenarios and test cases have been written there then Test manager can verify it and removed it in early stage.
Test Requirements are define in Requirement stage. As per the project build and development, requirement have been changes and updated. So this is very important for tester to understand each and every requirement and prepare test suit according to it.
Now we will learn how we can add requirement in test link. For that we need to login with the Test Link. Login with proper credentials and navigate to the home page. Select your test project from drop down menu which is placed on right corner of home screen.
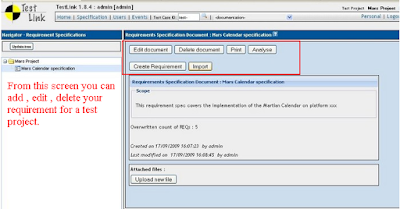
You will see here ‘Requirement’ tab. Now click on ‘Requirement specification document’. It will navigate you on the page where you can enter all details about your test project.
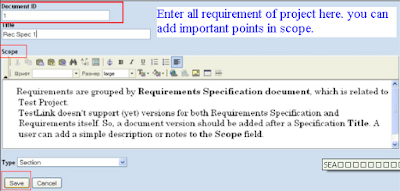
Click on ‘Create Requirement’ button then you will navigate to the page where you need to enter all the details.
As per the image we need to ad first ‘Requirement ID’. This field is displayed requirement document number.
Move to the next, ‘Title’ is second field. Here you need to enter title of the requirement document.
Then ‘Scope’ field is there. You need to define your requirement scope here with proper description so Test Manager can identify your test requirement properly.
Then select type of the requirement document and Click on ‘Save’ button. Thus your requirement is saved successfully in test project.
Now as per the below image we can Edit our requirement. If any change is not entered then you can edit you requirement by clicking on ‘Edit Document’ button.
Same as Delete button works. If your project is not active then you can delete your requirement document by clicking on ‘Delete document’ button.
You can print your created document by clicking on ‘Print’ option.
Analysis of the requirement project can be done by clicking on ‘Analysis’ button.
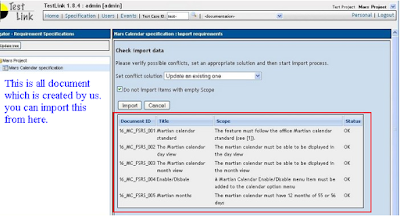
We can also import our requirement by clicking on this ‘Import’ button. We can save the requirement in our local environment by importing it.
One better feature of test link is, you can upload your requirement documents too.
As per screen, you can verify that you can upload file from this screen and here you need to upload CSV, XML and DOC format. Only this standard format is allowed by test link.
This is all about requirement document. You can save the document by given steps. After generating more data for requirement document, it will save as below.
As per explained above you can import this from ‘Import’ button.


HI Good one... is any possible to get info on IBM RFT
ReplyDelete