Earlier in my PREVIOUS POST, We learnt about how to install JIRA in windows OS. In this article, we will learn how to install JIRA in Linux machine.Kindly follow below steps for installing JIRA on Linux machine. Let's start how to do it.
Prerequisite : Java software should be installed in your system.
- Download trial version of JIRA from JIRA DOWNLOAD PAGE.
- Select System as 'Linux 64 bit' and click on download button.
- 64 bit may require more memory rather then 32 bit as it contain more java platform objects.
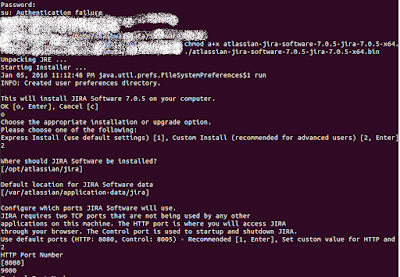
- Open Linux console.
- Enter your root Id and then enter your password. This is basic need for Customize installation in Linux.
- If your authentication is failed then try to do again.
- Enter destination path where you downloaded JIRA.
- ex. Directory : home/<username>/software/JIRA
- Run a command as chmod a+x atlassian-jira-X.Y.bin (where X.Y represents your version of JIRA) ex. chmod a+x atlassian-jira-software-7.0.5-jira-7.0.5-x64.bin
- Now You are getting to message on console as ' Unpacking JRE...' and 'Starting Installer'.
- Make sure that your Linux system containing latest version of JRE. Otherwise it may create problem to run JIRA.
- Then you can see the INFO as 'Created user preferences directory.
Now it will ask a question as,
This will install JIRA software 7.0.5 on your computer.
OK [ 0 , Enter], Cancel [c]
- It indicates that if you want to download JIRA on your computer then click on OK button by entering 0 or else C.
- Thus , Enter here 0 for continuing installation process.
Next it will ask
Choose the appropriate installation or upgrade option.
Please choose one of the following:
Express Install(use default settings) [1], Custom Install (recommended for advanced user) [2, Enter] , Upgrade an existing JIRA installation [3]
- It indicates that if you want to install 'Express' version of JIRA then Enter '1', if you want to download 'Custom' version of JIRA then Enter '2' , If you want to upgrade your JIRA version then Enter '3'.
- Thus , Enter '2' here because we want to install Customize JIRA.
Next it will ask about where you want to install JIRA? Then Enter directory where you want to install JIRA. Otherwise it will take default address.
- Then it will ask for PORT number as a part of configuration.
- JIRA requires two TCP ports that are not being used by any other applications on this machine. The HTTP port is where you will access JIRA through your browser. The control port is used to start up and shutdown JIRA.
Use Default ports(HTTP: 8080, Control 8005) – Recommended [1,Enter] ,
Set custom value for HTTP and Control Port [2]
- It indicates that , if you want default port then enter '1' on console and you want to set custom value then Enter '2'.
- If you have entered '2' then you need to enter server's Port number and control port from where you want to access JIRA.
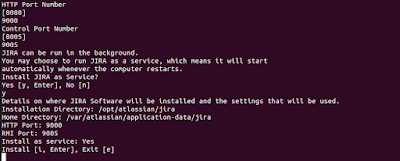
- Thus, Enter '2' and then Enter Port number as [9000] and control port number as [9005].
- You can refer below screen shot for more information.
- After wards you will get a message as 'JIRA can be run in the background.'
- You may choose to run JIRA as a service, which means it will start automatically whenever the computer restarts.
Install JIRA as Service?
Yes [y, Enter] , No [n]
- It is asking about JIRA service , Do you like to start it when your system is started? If you want to sat Yes the enter 'y' or else No 'n'.
- Thus, You need to Enter here 'y'.
- Then it displays all the details about JIRA like where it will installed and on which port it will be working. You can check it in screen shots.
- Now it will ask for exit.
Install [I, Enter], Exit [e]
- Here we can enter 'e' for close the console.
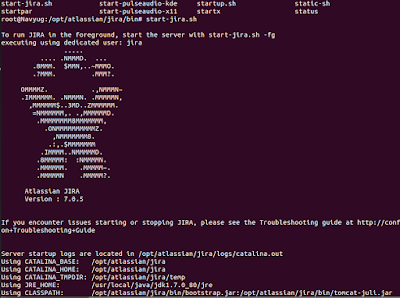
- From above screenshot we can see that JIRA software is about to RUN. Afterwards it will run on ‘localhost:9000/’ as we have given port number 9000.


No comments:
Post a Comment