Creating issues in JIRA is the most crucial part. We will learn here that how we can post an issue in JIRA tool. We need to enter all the details about the bug step by step. Take a look on the image.

- Click on 'Create' button here. When you will logged in to the JIRA tool at that time you can able to see this create button with blue color so you just need to click on it and you will get below screen.

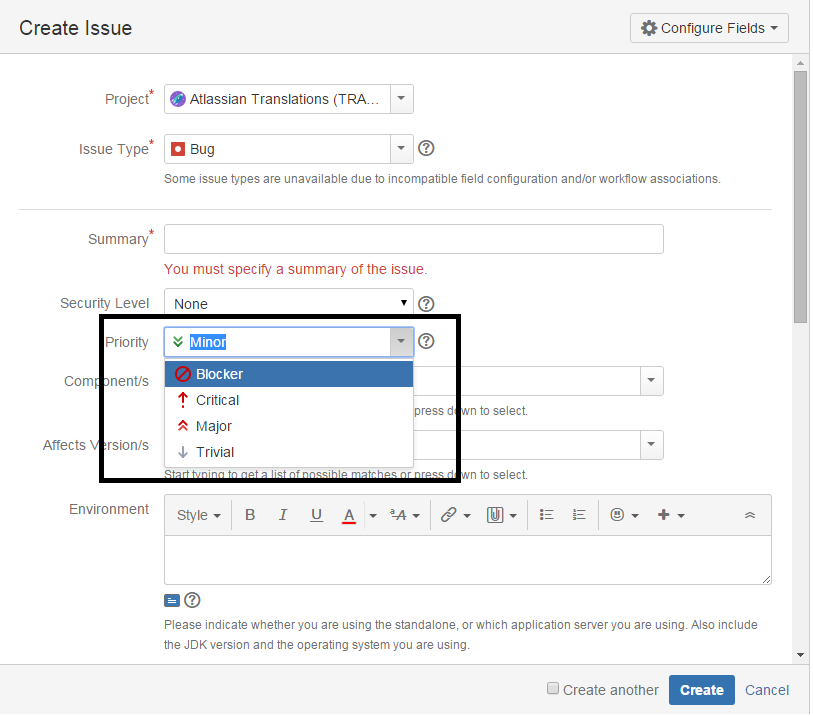
- Here you can see all the created Projects in drop down menu. Select a project from here in which you find an issue and you need to post it. Thus , Developer team can come to know about it.

- Now select Issue Type according to your issue, If it is a bug then select 'Bug' from drop down.
- If you want to add new feature then select 'New Feature' , If you want to do Request then select 'Request' and if you want to do Improvement for the project then select 'Improvement' Option from the Issue type field.

- In Next step , you need to enter Summary of the issue. That how it will affect to the project. What is the problem have been faced while using the application. How you get that issue in the product. You need to explain it in the 'Summary' field.

- Then select priority level of the issue. If it will block the application then mark it as 'Blocker' issue.
- If you found any high priority bug then select priority as 'Critical'. If you found medium level bug of an application which is not as much affect but issue is present in there then select 'Major' option. In last if you found any low level bug as UI issue or spell check or Designing issue then post it with 'Trivial' or 'Minor' status.
- Now Select component in which you were found an issue. Select that component from the drop down so developer can understand actual bug. Try to give then more and more information about the issue so they can solve it accordingly.
- Then select proper version of the application. It indicates in which release you found a bug because whole project is divide into small parts so you need to select related release version of the application in which you find a bug.
- Selecting environment is another important thing you need to do. If Issue have been found in QA Environment or Issue have been found in Developer Environment then accordingly you need to enter environment.
- If Developer found a bug during Unit testing then he can also post an issue with Developer environment and If QA people Found an issue then they can post an issue with QA environment.

- After wards you needs to describe whole issues in detail. You need to write down all the result which you get from the application. If you found any bug then describe its Reproducing steps then write about its actual result and then give proper explanation about the Expected result.
- Here in Expect result you nee to write what should application do in real time. So developer can easily understands issues and solved it for improvements of the application.
- Now you need to attach screen shot or document which help developers for solving the issues.

- Enter Estimation of the issue and select labels from the drop down.
- Write down story Points of the issue in 'Story Point' field.
- Then you need to select particular 'Sprint' for the project.
- Select 'Epic Link' from drop down. You can create Epic for a project too.

- Now click on 'Create' button. Thus , your issues have been created and you can verify it from 'Issue' tab which is placed on home page.

- Here you can see the demo issue which I have created as “Test Issue”.

- You can Identify here How we can write and select options for creating issues. Plus here you can see another filed as 'Assigned' which identified that we can assign this issue to the developer even assigned developer can also change this assignment.
- I have select here my newly created project which is 'Test Project' and fill up all the information.


- We can attached screen shot of an issue in Attachment field. Then we need to enter estimation , Story Point , Name of tester who have test the application.
- Now we need to select information for Label , Sprint , Epic link. And click here for creating the issue.
- If You want to create a copy of the issue then you need to check on the box and click on 'Create' button. Thus , You can create the issues.
- Now Once you have click on create then You can see the message on right corner just as below image.

- Then You need to go for 'Issue' Tab and click on 'My Open Issue'. (Issue--> My Open Issue).
- My Open issue → All Issue
- Search for 'Test Summary' issue which is our demo issue.

You can see here that we have posted issue successfully.
No comments:
Post a Comment