What Is Android SDK?
Android SDK is software development kit which enables you to create applications for android platform. For example if you wants to create game for android phone, you need installed android SDK with java programming. Also it provides ability to create emulators to test new created games or any other android apps. that's it.. No need to learn more than this for software testing engineer to test android apps using appium.
We learnt about appium software automation testing tool in THIS POST. Now we are going to setup environment to run software automation tests on android platform using appium. Using appium, We can create and run automation test for native apps and web apps too on android devices or emulators. Android SDK is prerequisite to run tests on android platform using appium. So let's install android SDK in windows platform. Please note, We have installed JDK in previous step as JDK is prerequisite to installing SDK.
We will divide Android configuration in 2 parts
- Android SDK Download And Installation.
- Set ANDROID_HOME and Path environment variables. View NEXT POST.
Bellow given steps will show you Android SDK software download and installation steps. My next post will show you how to set ANDROID_HOME and Path environment variables in windows.
Android SDK Download And Installation Steps
PREREQUISITE : PREVIOUS 2 STEPS of appium tutorials should be completed.
First of all you need to download Android SDK for windows and then we can install and configure it.
First of all you need to download Android SDK for windows and then we can install and configure it.
System Requirements
- 2 GB RAM minimum, 4 GB RAM recommended
- Microsoft® Windows® 8/7/Vista/2003 (32 or 64-bit)
- 20 to 30 GB Hard disk space.
Download Android SDK
For downloading android SDK,
- Go to this software web application page -> http://developer.android.com/sdk/index.html
- Scroll down to bottom of page.
- There will be SDK Tools Only" under "Other Download Options" section.
- Click on android-sdk_r(Version number)-windows.zip link e.g. android-sdk_r24.3.3-windows.zip as shown in bellow image.

- It will download android SDK zip file as sown in bellow image.

- Put zip file in E: drive. (Note : Android SDK needs 20 to 30 GB space on disc to store different files. So select appropriate disc where enough space is available.)
- Extract .zip file. You will get "android-sdk-windows" folder as shown in above image.
- Rename folder name from "android-sdk-windows" to "SDK" for easy name.

So now you have E:\SDK folder which is responsible to store android SDK related stuff.
Install Required Packages
In order to create android emulators for testing, You need to download and install few packages. You can do it using Android SDK Manager as described in bellow given steps.
- Look inside SDK folder. There will be "SDK Manager.exe".
- Execute it by double click. It will open Android SDK Manager dialog as shown in bellow image.
- Android SDK Tools package will be installed by default.
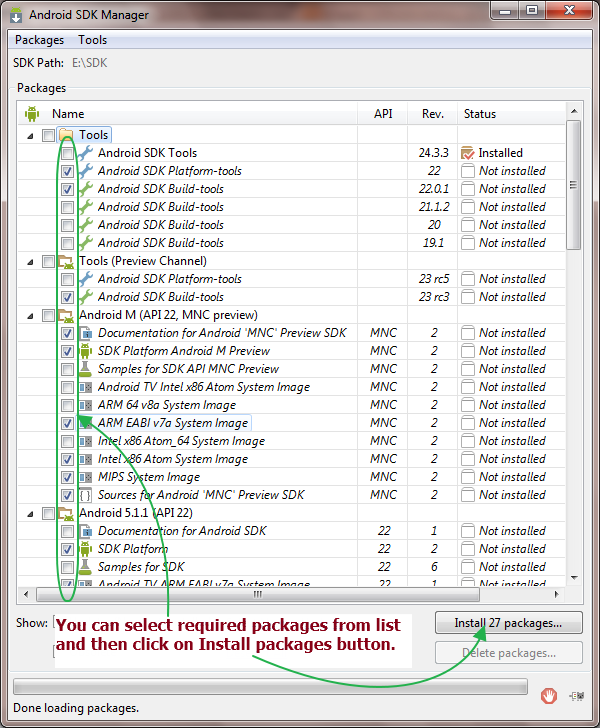
- You can select your required package from list of different packages and then click on Install packages button as shown in bellow image to install selected packages. I have installed different 27 packages as shown in 2nd image.
- I have installed different 28 packages from different folders as shown in bellow given images. You can download all bellow mentioned 28 packages to create different emulators with different configurations.
Note : Downloading all packages can take lot of time. It depends on your internet speed.


Install Intel Hardware Accelerated Execution Manager
After installation of all packages, You need to install Intel Hardware Accelerated Execution Manager to avoid error during android virtual device creation. Following steps will install it.
After installation of different packages and system images, You need to set ANDROID_HOME and Path environment variables. View next post to know how to set it.
After installation of all packages, You need to install Intel Hardware Accelerated Execution Manager to avoid error during android virtual device creation. Following steps will install it.
- At "E:\SDK\extras\intel\Hardware_Accelerated_Execution_Manager" path, You will find "intelhaxm-android.exe" file.
- Double click on "intelhaxm-android.exe" file to execute and install it.
My recommendation to reduce errors during android emulator creation and launch : Later on we will create android emulator using AVD Manager. When you create emulator, You need to set few properties on create new android virtual device to create new android emulator. But sometimes you will face problem like not display any option in Target or CPU/ABI or Skin drop down. Also you may face error on launch emulator. Reason behind this is some system image or related files are pending to install. So, I command you to install latest 5 API full packages. That means do not select individual file but select Tools, top 6 API level full folders and Extras folder and install them full as shown bellow. It will install all related files of that folder and reduce error in android emulator creation and launch.

This will reduce errors and complexity during android emulator creation and launch process.
That's it.

This will reduce errors and complexity during android emulator creation and launch process.
That's it.
After installation of different packages and system images, You need to set ANDROID_HOME and Path environment variables. View next post to know how to set it.
Very good post... Very beneficial.. (Y)
ReplyDeleteThanks a lot for sharing.
will you do some hybrid framework on selenium ? thanks
ReplyDeleteHi Aravind, First of all Thank you for your knowledge sharing. I am trying to install the SDK, In my SDK pupup it is not showing "Tools Folder & Android M" Packages.
ReplyDeleteIs it okay to install?
I have downloaded "android-sdk_r24.3.4-windows" version.
Can you please help me out?
Hi,
ReplyDeleteI have downloaded android-sdk_r24.3.4-windows" version.but when i can't install the packages.
Please help me.
Let me know your email
DeleteHi,Aravind, thank your leading us to a new interesting field.
DeleteI installed android-sdk_r24.4.1.
I found the reason why there are no "intelhaxm-android.exe" file.
because there are many packages which are not download and install
before you check the agree box, so after check I get what I need.
Thanks
Mak
Hi, Aravind, the packages now become too large, their number is 111, among them 57 packages can be download without check agree box, their are about 25G. I need a boi time to make sure how much are the left.Even it is not bother me. I wonder if there is a way to short them?
DeleteThank.
Mak
Hi, Aravind
ReplyDeleteIt's a beginning of 2016. I got lots from you in 2015, thank you.
I have download and install everything as said. The size of
system-images is 47.7GB.
Mak
Hi, Aravind. I downloaded Android version 24.4.1. But when I double clik on sdkmanager.exe file its not downloading the no.of packages you mentioned. Only one package , its getting installed. I didnot see other packages. Pls guide me
ReplyDeleteI got the issue. After setting http proxy address and port number in SDK manager i am able to down load all packages.
DeleteHi, Aravind. I have downloaded the "android-sdk_r24.4.1-windows", however when i double click on SDK MANAGER.exe, it pops up and goes off suddenly.Please guide me.
ReplyDeletethe posted information is very usefull ,thanks alot.
ReplyDeleteHi ,
ReplyDeleteWhen I was gone to download android sdk its showing "tools_r25.2.3-windows.zip" this link. Is this correct link because after downloaded it, its is not showing any sdk.exe file. Please help me out.
NO SDK MANAGER.EXE FILE FOUND AFTER DOWNLOADING THE ZIP AND EXTRACT IT. WILL YOU HELP ME ON THIS
ReplyDeleteIt is in tools\lib folder
Deletei am also facing same issue like sudha,
ReplyDelete"Hi, Aravind. I have downloaded the "android-sdk_r24.4.1-windows", however when i double click on SDK MANAGER.exe, it pops up and goes off suddenly.Please guide me."
can any body please help!
I am unable to find the SDK Manager.exe in the tools/lib folder .. can u help me
ReplyDeleteThanks,
Mathan
I'm not able to find SDK manager.exe under the folder you have specified
ReplyDeletePlease update the installation part of android sdk, as I think site have been updated.
ReplyDeleteKindly do this ASAP for me.
Thanks,
Rubi
The way to launch sdkmanager in 2018 is C:\android_sdk\tools\bin>sdkmanager.bat, and the exception caused by incompatibility between android sdk and JAVA 10 can be resolved by follow this post: https://stackoverflow.com/questions/49630165/how-to-configure-unity-2017-4-to-target-android-and-avoid-build-failures-on-osx/49630166#49630166
ReplyDelete